I finally spent some quality time with Xcode this past weekend. While I haven’t done any real work with it yet, I think it should be a serviceable IDE. The current version of Xcode at the time of this writing is 3.2.3, and it can be downloaded for free from Apple. You do have to register an account if you don’t have one yet, but you don’t have to pay anything until you want to join the iPhone Developer Program. You can’t actually install anything on a mobile device until you subscribe, which mainly gives you a one year certificate that you use to sign your applications.
Debug Messages
The preferred way to print debug messages is with NSLog. One thing to be aware of is that NSLog messages in Unit tests will not go to the debugger console in Xcode. They will however go to the system console, available via Applications -> Utilities -> Console.app. Personally I find that Unit tests largely obviate the need for debug statements, but they do come in handy sometimes. I also stumbled across a Stackoverflow question that describes what looks like a good technique for using breakpoints to generate debug output. Assuming those breakpoints aren’t in test code. More on that later.
Target Membership

{% img left /images/posts/2010-08-17-getting-started-with-xcode/compile-sources.png Compile Sources %}
If you get linker errors complaining that the class you’re trying to test isn’t found, you most likely just need to add that class to your test target. Some of the information you come across may say not to do this, but it’s most likely referring to Application tests and not Logic/Unit tests. The easiest way to see if a given file is part of the current target is to look for a check mark in the far right column of the file listing as shown above. You can also check the “Compile Sources” folder under the build target itself, or you can examine the target memberships of a specific file with Get Info -> Targets -> Target Memberships.
Testing
Xcode comes with the OCUnit testing framework, which has been around for quite a while. It provides all the standard equality assertions and setup/teardown stuff that you would expect from an xUnit testing framework. Here’s a very simple example of testing a property. I don’t see a need to maintain separate header files for Unit tests. The ordering for assertions is actual value, expected value, description, and the description is required.
#import <SenTestingKit/SenTestingKit.h>
#import "Person.h"

@interface PersonTest : SenTestCase {
}
@end

@implementation PersonTest

- (void) testName {
  Person *person = [[Person alloc] init];
  person.name = @"marc";
  STAssertEqualObjects(person.name, @"marc", @"");
}

@end
Apple’s documentation talks about Logic tests and Application tests. One of the key distinctions is that Logic/Unit tests directly include the code they’re testing, while Application tests are injected into the running application via a special target. Any project you set up is going to have at least four targets and two executables for various testing and debugging use.
Build Results
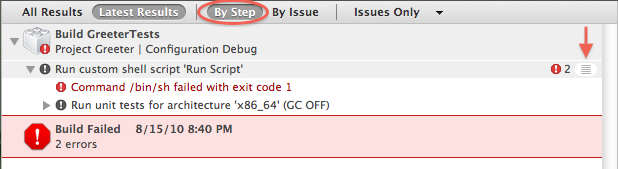
You can bring up the Build Results window with ⌘ - Shift - B, which will give you something like the screenshot below if you have a failing test. With the results window set to “By Step”, you have to click on the little horizontal lines button to see what tests failed, and even then you have to visually filter though all of the test output. Fortunately there is a better way.
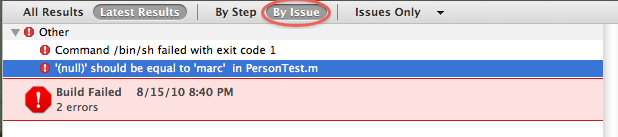
If you click on “By Issue”, you’re presented with a much nicer view that has a line for each failing test.
If you click on the test failure message, it’ll bring up the test file and highlight the failing assertion line as shown below. You can see that I just commented out the property setting line in my test to get it to fail for this example. From what I’ve read, Xcode used to display message bubbles in the main editor, but I haven’t been able to figure out if that behavior is still possible.

Uncomment the assignment statement, ⌘ - B, and we’re all green again.

Debugging
Debugging is an area that could use some work. Breakpoints in Unit tests just plain don’t work out of the box. Several kind people have written up guides explaining how to get them to work, and I’ve listed some of the better ones below. The core of the solution is creating a separate debug executable that you set some flags and environment variables on. Unfortunately the settings are different depending on if you’re targeting a Mac or iPhone. The options also sometimes change, rendering some posts you my find invalid. Note that breakpoints in application code do work, it’s just the ones in test code that require manual configuration. I plan to explore this area more in the future, but for now I’m more interested in getting some applications working.
Testing and Debugging Resources
- http://developer.apple.com/IPhone/library/documentation/Xcode/Conceptual/iphone_development/135-Unit_Testing_Applications/unit_testing_applications.html
- http://cocoawithlove.com/2009/12/sample-iphone-application-with-complete.html
- http://chanson.livejournal.com/119097.html
- http://code.google.com/p/google-toolbox-for-mac/wiki/iPhoneUnitTesting
- http://www.mulle-kybernetik.com/software/OCMock/
- http://developer.apple.com/mac/articles/tools/unittestingwithxcode3.html
- http://developer.apple.com/tools/unittest.html