Marc Schwieterman 2019-01-31T19:00:00-08:00 http://marcschwieterman.com/ Hugo -- gohugo.io <![CDATA[Infinity and Beyond: Count + 1]]> http://marcschwieterman.com/blog/infinity-and-beyond/2 Marc Schwieterman 2019-01-31T19:00:00-08:00 2019-01-31T19:00:00-08:00 This is a follow up post to Infinity and Beyond: Introduction.

The “Count + 1” approach pads the row count by one and uses that extra row to display loading and error information. While one of the simplest implementations, it also has one of the worst user experiences.

User Experience

Count + 1

This approach’s main weakness is its user experience. Because new content isn’t requested until the user reaches the end of the currently visible content, the user is forced to wait for every screenful of information. This can be very frustrating if they know that the content they’re interested in is several screens away. This approach also renders the scroll indicator useless because the total row count increases with every content response.

Complexity

This is one of the least complicated implementation approaches. There’s no need for OperationQueues or DispatchQueues. The main thing you need to do is manage request state, so that you don’t make more than one request for a given batch of data.

Code

What follows are some of the key parts of this approach. The full code for this example can be found in the Infinity and Beyond project.

As the name “Count + 1” implies, you’ll need to pad the actual current count of models by one.

override func tableView(_: UITableView,
        numberOfRowsInSection _: Int) -> Int {
    return models.count + 1
}

You need some way to track the request state. You don’t have to use an enum, but doing so clearly defines the expected states, which will make it easier to reason about them.

enum State {
    case loading
    case loaded
    case error
}

In tableView:cellForRowAt:, you simply return the row if you have it or initiate a new network request. If the view controller is already in the loading state, you only need to reconfigure the informational cell.

override func tableView(_ tableView: UITableView,
        cellForRowAt indexPath: IndexPath) -> UITableViewCell {
    let cell = tableView.dequeueReusableCell(
        withIdentifier: CountPlusOneCell.identifier) as! CountPlusOneCell

    if indexPath.row < models.count {
        let model = models[indexPath.row]
        cell.configure(for: .loaded(model))
    } else {
        cell.configure(for: .loading)
        switch state {
        case .loading:
            break
        case .loaded, .error:
            fetch()
        }
    }
    return cell
}

Retry can be as simple as tapping on a cell, but you can do whatever you want here.

override func tableView(_ tableView: UITableView,
        didSelectRowAt indexPath: IndexPath) {
    tableView.deselectRow(at: indexPath, animated: true)

    if state == .error {
        configureLastRow(for: .loading)
        fetch()
    }
}

Your code that executes network requests needs to manage the controller state to ensure everything else behaves correctly.

private func fetch() {
    state = .loading
    let nextRange = models.count ..< models.count + batchSize
    networkClient.fetch(offset: nextRange.lowerBound,
            limit: nextRange.count) { response in
        switch response {
        case let .success(newModels):
            self.insert(newModels: newModels, for: nextRange)
            self.state = .loaded
        case .failure:
            self.configureLastRow(for: .error)
            self.state = .error
        }
    }
}

After you’ve loaded the initial batch of data, inserting new rows will avoid moving the scroll position or visual changes that can result from reloading an already visible cell.

private func insert(newModels: [Model], for range: Range<Int>) {
    models.append(contentsOf: newModels)
    if models.count > range.count {
        let insertedIndexPaths = range.map {
            IndexPath(row: $0, section: 0)
        }
        tableView.insertRows(at: insertedIndexPaths, with: .none)
    } else {
        tableView.reloadData()
    }
}

Pros and Cons

  • Pros
    • Low complexity
    • No need for separate queues
  • Cons
    • User must wait for every screenful of content
    • No scroll indicator

Conclusion

That’s it for this example. Next up will be a refinement on this approach to improve the user experience.

]]>
<![CDATA[Infinity and Beyond: Introduction]]> http://marcschwieterman.com/blog/infinity-and-beyond/1 Marc Schwieterman 2019-01-24T13:50:00-08:00 2019-01-24T13:50:00-08:00 I recently had to implement infinite scrolling in an iOS app. If you’re not familiar with infinite scrolling, it’s an alternative to pagination, where instead of having the user explicitly do something to advance to the next page, new content is lazily loaded as the user nears the end of the currently visible content. This pattern is often used on the web for social media sites, where its main goal is to increase engagement. If you don’t have to click on a “next” button, it’s much easier for you to keep consuming content.

The often slow or unreliable networks that mobile devices operate on make it even more difficult to implement infinite scrolling well. You can’t provide a seamless transition to the next batch of data if the network isn’t available when you need it, or if it takes several seconds to retrieve the data you need. This post will outline a variety of considerations, along with a brief overview of two general implementation approaches.

Keeping It Simple

If you’re contemplating infinite scrolling, make sure that you actually need it, and think carefully about the impacts on user experience. If the data you’re displaying is small enough, there may not be a significant benefit to fetching it incrementally. If you can get everything in a single request, your code will be simpler, and there’s no risk of not having the data you need when the user wants to view it. Remember also that every network request is an opportunity for an error. If you wait to load data on-demand, the user may have lost their network connection, and now what was intended to improve user experience has instead harmed it. You may be able to get the best of both worlds by fetching a small amount of data up front, then proactively fetching the rest of it in the background, so it’ll be there when you need it.

Things to Consider

So you’ve decided that infinite scrolling makes sense for your app. There are a variety of things to consider related to your user experience goals, the kind of data you’re working with, and the API that is providing the data. In addition to the questions below, the Nielsen Norman Group discusses some of the trade-offs of infinite scrolling in their article, Infinite Scrolling Is Not for Every Website. While written in the context of the web, some of the concepts are applicable to mobile apps too.

User Experience

Is position in the data you’ll be displaying meaningful? Depending on the implementation that you choose, it may not be possible to show an accurate scroll indicator. It’s also possible that the total number of results may change, so you’ll have to decide if and how you want to communicate that to the user. What are your primary goals? Are you trying to decrease latency? Are you trying to minimize cellular data use? How common is it for users of your app to have intermittent network connectivity? How important is this feature to your app? The answers to questions like these will help you decide how much complexity is justified and ultimately which implementation to use.

API

The API that provides your app’s data can place strong constraints on your implementation decisions. Do you control the API, or is it provided by a third party? Are there rate limits to worry about? What will you show the user if you exceed a limit? Is the result set that you’re displaying stable, or can it change while you’re viewing it? Are the results explicitly ordered? Will you hide duplicate results if you receive them? Is there any way for you to detect missed results? Does your API use indices that you can calculate, or is it cursor-based, which may force you to serialize your network requests and prohibit cancellation of pending requests?

Blocking vs Non-Blocking

In the iOS apps that I use, I’ve seen two main infinite scrolling variants, which I’ll be referring to as blocking and non-blocking. I’ll also be discussing these approaches in the context of a UITableView, but everything should be relevant to UICollectionView and custom UI too.

The blocking version of infinite scrolling allows the user to scroll all the way to the bottom of the screen. Once at the end of the current data, a loading view is displayed, usually as either a UITableViewCell or a table footer. The user then has to wait while the next batch of data is fetched. Once the new data arrives, it is added to the table, and the user can continue. While the need to wait for every screenful of data can be frustrating, this approach is considerably easier to implement than any of the alternatives.

The non-blocking version does not interrupt scrolling, instead it shows a loading version of cells while their data is retrieved. Once the data arrives, the cells that were in a loading state are updated to display the real data. This approach has the potential to provide a better user experience. However it’s still highly dependent on network performance, and because the UI is never blocked, it may be necessary to implement more complex batching or delays in the app in order to avoid exceeding API rate limits. Building Concurrent User Interfaces on iOS has some great information on loading table view content asynchronously.

Both approaches above can be enhanced by proactively fetching more data before it’s needed. Common techniques involve running code in scrollViewDidScroll or even layoutSubviews as discussed in Advanced ScrollView Techniques. If you’re targeting iOS 10 or newer, you can use UITableViewDataSourcePrefetching or UICollectionViewDataSourcePrefetching as discussed in What’s New in UICollectionView in iOS 10.

Conclusion

Hopefully this post has given you some things to think about. Which of the two approaches above make sense for your app depends a lot on the specifics of the data you’re displaying, as well as how much technical complexity is appropriate for the features you’re implementing. Upcoming posts will provide some example implementations of infinite scrolling and discuss the trade offs involved.

]]>
<![CDATA[Mobile CI in 2018]]> http://marcschwieterman.com/blog/mobile-ci-in-2018 Marc Schwieterman 2018-08-08T08:30:00-07:00 2018-08-08T08:30:00-07:00 It’s been a couple years since I looked at the options for Mobile Continuous Integration (CI) for iOS apps. Last time I did this, I decided on BuddyBuild, who has since been bought by Apple. Unfortunately BuddyBuild is no longer accepting new customers, and they discontinued free plans and Android support in March of 2018. I hope this means that Apple will offer their own hosted CI solution soon, and with any luck it will go as well as the acquisition of TestFlight did. There was no news at this year’s WWDC, so for now we must find something else.

Candidates

While I’ve built complicated CI setups on Jenkins in the past, I don’t think that’s a good use of most people’s time these days. I’m also not interested in Xcode Server because it had a lot of stability problems when my team used it. It’s possible that our Mac Mini just wasn’t up to the task, but even if that was the issue, its native feature set is pretty basic. If you do want to roll your own Xcode Server or Fastlane setup, MacStadium seems to be a popular hosting provider.

The options I found are similar to two years ago. Buddybuild is gone, but Visual Studio App Center looks interesting. The GreenhouseCI domain now forwards to Nevercode, so I assume they changed their name or there was some kind of acquisition. That leaves us with the following candidates.

Features

The current hosted Mobile CI options come in two main flavors. There are “full feature” providers that try to automatically configure everything for you, as well as manage code signing and the various mobile-specific deatils. Then there are services that basically give you a Mac VM and some job infrastructure. The latter tend to be cheaper than a full time Mac hosting provider, and they also have some nice features that are generally useful for CI builds, like custom VM images and workflows.

The features I care about are as follows.

  • VCS support: cloning repos, starting builds on push, updating build status 1
  • Deployment: both ad-hoc and to AppStore Connect
  • Extensibility: some way to run code review tools like Danger.
  • Crash reporting: web access to crash reports is nice, and most services offer other integrations, so you can get notification in your chat software or have tickets opened automatically for new crashes.
  • Basic analytics

Based on my reading of the documentation, these are the features that are supported.

Service VCS Deployment Extensibility Crash Reporting Analytics Other
Bitrise Bitbucket, GitHub, Gitlab yes Step Library no no no
App Center Bitbucket, GitHub, VSTS yes build lifecycle scripts yes yes real device testing, push notifications
Nevercode Bitbucket, GitHub, Gitlab 3rd party only build lifecycle scripts / Fastlane no no real device testing 2
CircleCI Bitbucket, GitHub Fastlane full control no no
Travis CI GitHub Fastlane full control no no

Pricing

Pricing strategies vary quite a bit. They’re usually based on some combination of number of concurrent builds, build runtime and number of total builds for the month. Some services offer an open source discount, which is usually free. Low usage plans range from $40 - $100, and some providers offer a modest discount for paying yearly instead of monthly.

These are the prices at the time of this writing. Most plans scale up beyond the entry-level tier by charging for more concurrent builds, and features like real device testing and push notifications are usually an additional charge.

Service Free Tier Lowest Paid Tier Discounts
Bitrise 10 minutes per build / 200 builds per month $40 / 45 minutes / unlimited builds Student, Contributor
App Center 30 minutes per build / 240 minutes per month $40 / 60 minutes / unlimited
Nevercode n/a $99 / 2 apps / 2 concurrent builds / 45 minutes per build / unlimited builds per month Case by case
CircleCI n/a $39 / 2 concurrent builds / 500 minutes per month Open Source
Travis CI n/a $69 / unlimited Open Source

Conclusion

The only candidate that provides the same level of functionality that BuddyBuild did is Visual Studio App Center. I assume that some of their iOS functionality came from their acquisition of HockeyApp, which I’ve used in the past and been happy with. Being a Microsoft offering, I think we shouldn’t have to worry about it going away anytime soon. All that said, only 240 build minutes per month on the free tier is low. Once you account for dependency setup, launching the simulator for tests and possibly doing an archive build, it’s not hard to have an iOS build get into the 5-10 minute range with even a minimal number of tests. While I can’t recommend something I haven’t used yet, App Center would be on the top of the list if I was doing this evaluation for a client.

Nevercode doesn’t have a free tier, and their entry level is more than double the cost of other options. They also don’t have some features that I’m interested in.

Travis and Circle only offer a free tier for open source, and they’re both more work to setup and maintain than I want to deal with. Travis also doesn’t support Bitbucket. While I haven’t used Circle’s macOS platform, I have used it for Ruby and Elixir projects both at an employer and personally. Their 2.0 platform works well and has good documentation, so I would seriously consider it if I needed that level of control.

Finally there is Bitrise. It doesn’t have all the features I’d like, but it has the ones that are most important to me - VCS support, deployment and extensibility. With 200 builds per month, the free tier should cover the needs of small or personal projects. I also like that they give a discount for contributing to their platform. I’ll be trying Bitrise out, and I’ll capture my experience there in an upcoming post.


  1. I use Bitbucket for private repos.
  2. via AWS Device Farm
]]>
<![CDATA[MB vs MBP]]> http://marcschwieterman.com/blog/mb-vs-mbp Marc Schwieterman 2017-07-03T12:10:18-07:00 2017-07-03T12:10:18-07:00 I’ve been using a second generation MacBook for a little over a year now, and in many ways I love it. The performance is good enough most of the time, and the portability has helped me get a lot more done because of how easy it is to carry the MacBook and use it in a variety of places.

All that said, I had enough performance and stability issues that I was eager to upgrade when the third generation model was announced at WWDC. While I have no issues upgrading my iPhone every year, it’s been very unusual for me to want to upgrade a Mac that often. I decided to try the MacBook Escape1 alongside the latest MacBook because I want to be sure I’ll still be happy with my Mac this time next year.

I tested the following configurations.

MacBook (Early 2016) MacBook (2017) MacBook Pro (13”, 2017, w/o TouchBar)
1.3GHz Dual-Core M7 1.4GHz Dual-Core i7 2.5GHz Dual-core i7
Intel HD Graphics 515 Intel HD Graphics 615 Intel Iris Plus Graphics 640
8GB 1866MHz LPDDR3 16GB 1866MHz LPDDR3 16GB 2133MHz LPDDR3 SDRAM
512GB PCIe SSD 512GB PCIe SSD 512GB PCIe SSD

Stability

My chief complaint with the 2016 MB was stability. Early on with Sierra, it would lock up and need to be rebooted about once a week. This most often happened when connecting or disconnecting from an external monitor, but it would just happen randomly sometimes too. Stability did improve greatly in later versions of Sierra, but it was still one of the least reliable Macs I’ve owned.

Sometimes the transition into the Spaces selection UI at the top of the screen would get stuck, requiring either killing the Dock process or rebooting. I suspect a lot of these stability issues may be related to the meager 8 GB of memory in the 2016.

I didn’t notice any of these issues with the 2017 MB, but I didn’t use it very heavily. The 2017 13” MBP has been rock solid.

Performance

Performance on the 2016 MacBook was often good enough, but it was noticeably slower at any kind of long running task. Web browsing would sometimes also feel sluggish, especially on sites with lots of images. A reboot would often improve things.

The 2017 MacBook feels faster. I think the memory makes the biggest difference. The first run of Geekbench that I did on the 2016 was almost half of the scores below, with subsequent runs after a reboot all being around the same. I suspect that is representative of the general performance hit I would notice if I hadn’t rebooted in a while.

  MacBook (Early 2016) MacBook (2017) MacBook Pro (13”, 2017, w/o TouchBar)
Geekbench Single / Multi 3567 / 7080 4152 / 8080 4950 / 9735
Unarchive Xcode 9 7:40 5:50 4:16
Build & Test app
(launching simulator)
1:02 0:59 0:46
Build & Test app 0:24 0:24 0:17

Size

While I still appreciate the lightness of the MacBook, the size of the 13” Pro works better for me. I’m a pretty big guy, and the 12” MacBook would often feel like it was going to slip through my legs, while the 13” Pro rests comfortably. I also appreciate the slight increase in screen size. It’s just enough to fit an editor and web browser side by side when doing web development. Simply put, I think the 13” is small enough. Oddly I found the larger power adapter of the 13” to be more concerning than the larger size of the computer itself.

2017 12", 2017 13", 2015 15"

Final Thoughts

The 2017 MacBook is a solid update. It feels faster, and I think the extra memory would have resolved most of the performance issues I had with it. The keyboard has a nicer feel to it, making the 2016 model feel mushy in comparison, although the original keyboard never bothered me. For some reason the USB port on the 2017 seemed to stick a little. I’m not sure if that was an actual change, or if the one I got was just on the tighter end of the acceptable range.

Ultimately I still felt like I’d be tempted to upgrade again next year, so I’m sending the 2017 MacBook back and keeping the 13”. I think it will be better for the things I use it for, and the second USB port will save me from needing an additional adapter in all but the rarest of cases. My only real regret is the extra pound I’ll be lugging around with me, but I think the other benefits are worth it.

]]>
<![CDATA[Modelines in Git Commit Messages]]> http://marcschwieterman.com/blog/modelines-in-git-commit-messages Marc Schwieterman 2015-07-22T00:00:00+00:00 2015-07-22T00:00:00+00:00 I’ve been cleaning up my Vim config this week, and I noticed some strange errors while doing an interactive rebase in my dotfiles repository.

Error detected while processing modelines:
line    1:
E518: Unknown option: <some text from the first commit message> 

Because of the way I format commit messages for my dotfiles, the first line of the file presented during an interactive rebase was being interpreted as a modeline. I was hoping there was a command line option or something that I could use to disable modelines, but as far as I can tell, you have to do it in your .vimrc.

This isn’t likely to be a problem for most people, as I don’t imagine there are many that have vim: at the beginning of their commit messages. However if you run into this problem, you can solve it by adding the following to an appropriate place in your .vimrc

autocmd FileType gitrebase setlocal nomodeline
]]>
<![CDATA[Return of the Daemon]]> http://marcschwieterman.com/blog/return-of-the-daemon Marc Schwieterman 2015-07-08T00:00:00+00:00 2015-07-08T00:00:00+00:00 I’ve been enjoying having the new Apple Music service in iTunes quite a bit, but one thing has been driving me crazy: the keyboard controls don’t work anymore. Except they do.

Before 12.2, iTunes would infuriatingly launch every time you plugged a set of headphones into your laptop. I eventually found a post that identified the Remote Control Daemon as the culprit for this behavior. Simply unloading the daemon fixed the problem. No more iTunes launching when it wasn’t wanted, and the keyboard controls still worked. Until now that is.

Fortunately starting the service back up is as easy as:

launchctl load /System/Library/LaunchAgents/com.apple.rcd.plist

Note that if you disabled the service to make double-sure it’d never run again, you may have to re-enable it by editing the following line in the plist.

<?xml version="1.0" encoding="UTF-8"?>
<!DOCTYPE plist PUBLIC "-//Apple//DTD PLIST 1.0//EN" "http://www.apple.com/DTDs/PropertyList-1.0.dtd">
<plist version="1.0">
<dict>
    <key>Disabled</key>
    <false/> <!-- double negate here! -->
    ...
</dict>
</plist>

So far my keyboard controls are working again, and iTunes has yet to launch when plugging in headphones. Let’s hope it stays that way.

]]>
<![CDATA[The Initiative]]> http://marcschwieterman.com/blog/the-initiative Marc Schwieterman 2015-05-15T00:00:00+00:00 2015-05-15T00:00:00+00:00 My friend Bill and I have been working on a podcast about learning iOS development, and it’s finally here. We recorded several episodes before we figured out enough of the recording and hosting process to release anything, so there’s already a decent backlog. New episodes should continue to come out every Friday.

Check it out at The Initiative.

]]>
<![CDATA[Bypass VPN by Hostname]]> http://marcschwieterman.com/blog/bypass-vpn-by-hostname Marc Schwieterman 2014-01-20T00:00:00+00:00 2014-01-20T00:00:00+00:00 If you run VPN on your router, you may have had cases where you want Internet traffic to bypass the VPN. Most solutions I’ve found use some form of a script originally found on LinksysInfo. However these approaches are IP based, which can be a problem if those IPs change, or if the service you’re accessing uses a CDN. If your router is running firmware that supports ipset, you can use dnsmasq and iptables to solve this problem.

This example uses release 112 of Tomato by Shibby. Some versions of utilities are not the latest available, so syntax may be slightly different than readily available man pages. The code snippets below include a commented reference to where they go in the admin GUI, but this is just what worked for me.

The core of the solution is to create an ipset for hosts of interest, configure Dnsmasq to populate that ipset and then use iptables rules to route outgoing traffic to those IPs over the WAN instead of over the VPN.

# Administration > Scripts > Init

ipset --create bypass_vpn iphash
modprobe ipt_set

The first thing you need to do is create an ipset and load the ipt_set kernel module. Here we’ve created an ipset named bypass_vpn of type iphash. Note that newer versions of ipset use a different syntax, hash:ip, for the set type. If you later get errors from iptables when trying to create rules with the ipset, you probably forgot to load the kernel module.

# Advanced > DHCP/DNS > Dnsmasq Custom configuration

server=/example.com/192.168.1.1
ipset=/example.com/bypass_vpn

#log-queries

Next you need to tell Dnsmasq to route DNS requests to a DNS server that is going to give you location appropriate results. This is particularly important if you’re trying to get traffic to use a local CDN. In the above example, example.com is our host of interest, 192.168.1.1 is the IP of a DNS server that will resolve that host to a desirable IP and bypass_vpn is the ipset to store the results in for later use by iptables. You will need a server/ipset pair for every hostname you wish to bypass the VPN.

When you’re first setting things up, you’ll probably want to also add log-queries to the Dnsmasq config, which will log DNS requests to the system log at /var/log/messages. In addition to hostnames you’re already aware of, be on the lookout for hosts referred to by CNAME records.

# Administration > Scripts > WAN Up

# The commands needed to create the routing table for packets marked with a
# 1 are not shown here. See the aforementioned LinksysInfo thread for more
# information.

# MARK = 0; all traffic goes through VPN by default
iptables -t mangle -A PREROUTING -i br0 -j MARK --set-mark 0

# MARK = 1; bypass VPN for bypass_vpn ipset
iptables -t mangle -A PREROUTING -i br0 -m set --set bypass_vpn dst -j MARK --set-mark 1

Finally you need to create rules to mark packets matching the ipset. In the above example, br0 is the interface the packets are entering through, bypass_vpn is the ipset containing the IPs to match and 1 is the mark value corresponding to a routing table that bypasses the VPN. This is not a complete iptables configuration. Only the packet marking rules are shown. Note that the --match-set option mentioned in the iptables man page did not work for me.

]]>
<![CDATA[Testing in the OSX Sandbox]]> http://marcschwieterman.com/blog/testing-in-the-sandbox Marc Schwieterman 2012-11-26T00:00:00+00:00 2012-11-26T00:00:00+00:00 If you’re running Application Unit Tests, and have just enabled entitlements, you will immediately be greeted with an error similar to the following.

2012-11-26 20:16:56.352 SandboxFail[25356:303] Error loading /Users/marc/Library/Developer/Xcode/DerivedData/SandboxFail-arfkzlcptzkjqjcqelqwsfsxhasn/Build/Products/Debug/SandboxFailTests.octest/Contents/MacOS/SandboxFailTests: dlopen(/Users/marc/Library/Developer/Xcode/DerivedData/SandboxFail-arfkzlcptzkjqjcqelqwsfsxhasn/Build/Products/Debug/SandboxFailTests.octest/Contents/MacOS/SandboxFailTests, 262): no suitable image found. Did find: /Users/marc/Library/Developer/Xcode/DerivedData/SandboxFail-arfkzlcptzkjqjcqelqwsfsxhasn/Build/Products/Debug/SandboxFailTests.octest/Contents/MacOS/SandboxFailTests: open() failed with errno=1 IDEBundleInjection.c: Error loading bundle ‘/Users/marc/Library/Developer/Xcode/DerivedData/SandboxFail-arfkzlcptzkjqjcqelqwsfsxhasn/Build/Products/Debug/SandboxFailTests.octest’

It appears that test bundles cannot be injected into a signed application. After a couple failed attempts to sign the test bundle itself, I found a Stackoverflow post that recommended disabling code signing in a separate build configuration. It was not immediately obvious to me how to do that, so here’s what worked for me.

Create Build Configuration

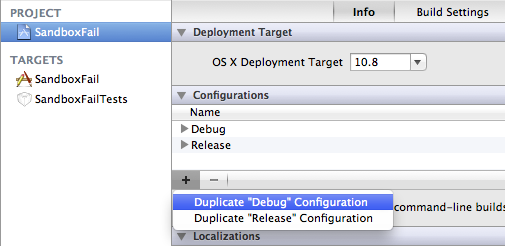
The first thing to do is duplicate the Debug configuration to make one specifically for testing. This is done under the main project configuration, as shown below. I named my new configuration Test.

Duplicate Debug Configuration

Disable Code Signing

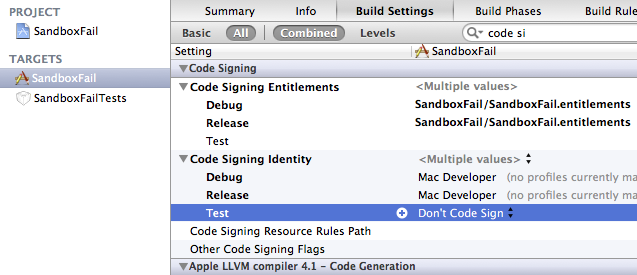
Code signing can be disabled in the build settings for the main target of the project. Make sure to expand the disclosure triangle and only clear the settings for the Test configuration. You don’t have to select or type anything specific in the values column. You can just click on Test and hit your keyboard’s equivalent of delete, which will restore the default values.

Disable Code Signing

Configure Schemes

After that you need to open the scheme editor (Command-Shift-<) and select the newly created Test configuration.

Update Test Scheme

Update Dependencies and Clean

If you use Cocoapods to manage your dependencies, you’ll want to run pod install to link the pod lib into the new Test configuration. After that just do a full clean (Command-Option-Shift-K), and you’re ready to run your tests. (Command-U)

]]>
<![CDATA[RubyMotion Functional Tests with Storyboards]]> http://marcschwieterman.com/blog/rubymotion-functional-tests-with-storyboards Marc Schwieterman 2012-07-05T00:00:00+00:00 2012-07-05T00:00:00+00:00 If you’ve been using RubyMotion, you probably noticed that some new testing features were released today. The video in the announcment post and the documentation are pretty good, so I’m just going to share a few things that I had to do to get things working.

main_spec.rb

Both the video and documentation have you add a test environment guard clause to your application:didFinishLaunchingWithOptions: method in the application delegate. Be aware that this will likely cause the window test in the default main_spec.rb to fail, so either delete that or anticipate some test failures due to the initialization changes.

Project Configuration

Update 2012/07/14: The specs_dir is searched recursively now, so the workaround that was previously in this section is no longer needed.

Storyboards

Update 2012/07/21: Storyboards are now supported by passing an :id option. The documentation has not yet been updated, but the pending updates can be found on the RubyMotionDocumentation github page.

If you’re using Storyboards, you’ll have to pass the Xcode identifier of the controller to the tests method in the :id option.

# list_view_controller_spec.rb
describe 'list view' do

  # this call also extends the context with the test API methods
  tests ListViewController, :id => 'list-view-controller'

  it 'should have two cells by default' do
    views(UITableViewCell).count.should == 2
  end

end

Spurious Errors

You may occasionally see errors like the following.

...
3 specifications (3 requirements), 0 failures, 0 errors
*** simulator session ended with error: Error Domain=DTiPhoneSimulatorErrorDomain Code=1 "The simulated application quit." UserInfo=0x10014de60 {NSLocalizedDescription=The simulated application quit., DTiPhoneSimulatorUnderlyingErrorCodeKey=-1}
rake aborted!
Command failed with status (1): [DYLD_FRAMEWORK_PATH="/Applications/Xcode.a...]

Tasks: TOP => simulator
(See full trace by running task with --trace)

I suspect this is the 0.3 second delay condition mentioned in the comments for the functional test code. Clearly the universe is telling me to get the new retina MBP.

]]>
<![CDATA[OSX Lion Key Repeat in IntelliJ]]> http://marcschwieterman.com/blog/osx-lion-key-repeat-in-intellij Marc Schwieterman 2012-05-31T00:00:00+00:00 2012-05-31T00:00:00+00:00 I’m mildly obsessed with Vim, so of course I prefer to use similar input methods whenever available. I’ve been working on a Javaish project lately, and I ran into the alternate character feature in OSX Lion, which does not play nice with the IdeaVim plugin for IntelliJ.

After getting tired of repeating keystrokes a ridiculous number of times, I did some searching and came across many explanations of how to globally disable the feature. While the lack of key repeat is a problem in IntelliJ, I could imagine alternate character input being useful in other applications. Fortunately I found a helpful blog post with a fix for specific applications in the comments.

Here’s the exact terminal command for IntelliJ.

defaults write com.jetbrains.intellij ApplePressAndHoldEnabled -bool false
]]>
<![CDATA[Testing Warden-Based Sinatra Apps]]> http://marcschwieterman.com/blog/testing-warden-based-sinatra-apps Marc Schwieterman 2011-03-28T07:06:48+00:00 2011-03-28T07:06:48+00:00 I recently integrated Warden into a web service I’ve been building with Sinatra. Unfortunately doing so completely broke some of my tests. I spent a while trying to figure out how to stub out the Warden object before I discovered that Warden already provides support for testing. Awesome. While I could load my config.ru in the test, there are other things in there that I’d rather not deal with while testing. I came up with the following approach, which lets me more or less test the web service in isolation.

require 'rack/test'
require 'sinatra'
require 'rspec'
require 'warden'

# model
class User
  attr_reader :id
  attr_reader :name
  def initialize(name)
    @id = 1 # please don't really do this
    @name = name
  end
end

# modular sinatra app
class Greeter < Sinatra::Base
  get '/' do
    "Hello, #{request.env['warden'].user.name}"
  end
end

# tests
describe Greeter do
  include Rack::Test::Methods
  include Warden::Test::Helpers

  after(:each) do
    Warden.test_reset!
  end

  def app
    Rack::Builder.new do
      # these serialization methods don't do anything in this example,
      # but they could be necessary depending on the app you're testing
      Warden::Manager.serialize_into_session { |user| user.id }
      Warden::Manager.serialize_from_session { |id| User.get(id) }
      # your session middleware needs to come before warden
      use Rack::Session::Cookie
      use Warden::Manager
      run Greeter
    end
  end

  it 'says hi to me' do
    login_as User.new('Marc')
    get '/'
    last_response.body.should == 'Hello, Marc'
  end
end

This is basically just an inline rackup file. Where you would normally return just the Sinatra app, you instead put together the bits that you need to exercise the code under test.

]]>
<![CDATA[Roo-based Jersey Apps on GAE]]> http://marcschwieterman.com/blog/roo-based-jersey-apps-on-gae Marc Schwieterman 2011-02-24T07:39:42+00:00 2011-02-24T07:39:42+00:00 This past weekend I put together an example of a Spring Roo-based Jersey application that can run on Google App Engine. All code in this post is derived from the example project at https://github.com/marcisme/jersey-on-gae-example. You should be able to get a project up and running by copy and pasting the snippets in this entry, or you can clone the project and follow along. This example uses Spring Roo 1.1.1, Jersey 1.5 and App Engine SDK 1.4.0. A basic understanding of the involved technologies is assumed.

Project

The first step is to create your project. Create a directory for the project, fire up the Roo shell and then enter the commands below. This will both create a new project and configure it to use App Engine for persistence. Make sure to substitute an actual app id for your-appid if you plan to deploy this example.

project --topLevelPackage com.example.todo
persistence setup --provider DATANUCLEUS --database GOOGLE_APP_ENGINE --applicationId your-appid

Dependencies

Once you’ve set up your project for GAE, you’ll need to add the dependencies for Jersey and JAXB. If adding them manually, you can refer to the dependencies section of the Jersey documentation. In either case, you’ll need to add the Jersey repository to your pom.xml.

<repository>
    <id>maven2-repository.dev.java.net</id>
    <name>Java.net Repository for Maven</name>
    <url>http://download.java.net/maven/2/</url>
    <layout>default</layout>
</repository>

Jersey

Once you’ve added the Jersey repository, you can use these command to add the dependencies to your project.

dependency add --groupId com.sun.jersey --artifactId jersey-server --version 1.5
dependency add --groupId com.sun.jersey --artifactId jersey-json --version 1.5
dependency add --groupId com.sun.jersey --artifactId jersey-client --version 1.5
dependency add --groupId com.sun.jersey.contribs --artifactId jersey-spring --version 1.5

Unfortunately the jersey-spring artifact depends on Spring 2.5.x. Because Roo is based on Spring 3.0.x, you need to add some exclusions to prevent pulling in incompatible versions of Spring artifacts.

<dependency>
    <groupId>com.sun.jersey.contribs</groupId>
    <artifactId>jersey-spring</artifactId>
    <version>1.5</version>
    <exclusions>
        <exclusion>
            <groupId>org.springframework</groupId>
            <artifactId>spring</artifactId>
        </exclusion>
        <exclusion>
            <groupId>org.springframework</groupId>
            <artifactId>spring-core</artifactId>
        </exclusion>
        <exclusion>
            <groupId>org.springframework</groupId>
            <artifactId>spring-web</artifactId>
        </exclusion>
        <exclusion>
            <groupId>org.springframework</groupId>
            <artifactId>spring-beans</artifactId>
        </exclusion>
        <exclusion>
            <groupId>org.springframework</groupId>
            <artifactId>spring-context</artifactId>
        </exclusion>
    </exclusions>
</dependency>

JAXB

App Engine has issues with some versions of JAXB. I found 2.1.12 to work, while 2.1.13 and 2.2.x versions did not. This will hopefully change in the future. You can add a dependency on JAXB with the following command.

dependency add --groupId com.sun.xml.bind --artifactId jaxb-impl --version 2.1.12

Spring

If you’re adding jersey to a project that uses Roo’s web tier, you’ll already have the spring-web dependency in your project. If not, you’ll need to add that too.

dependency add --groupId org.springframework --artifactId spring-web --version ${spring.version}

You can specify an explicit version, but if you created your project with Roo, the spring.version build property should be set. Either way you’ll want to exclude commons-logging.

<dependency>
    <groupId>org.springframework</groupId>
    <artifactId>spring-web</artifactId>
    <version>${spring.version}</version>
    <exclusions>
        <exclusion>
            <groupId>commons-logging</groupId>
            <artifactId>commons-logging</artifactId>
        </exclusion>
    </exclusions>
</dependency>

Maven GAE Plugin

For some reason Roo uses a rather old version of the Maven GAE Plugin. The latest version at the time of this writing is 0.8.1. In addition to what Roo will have created for you, you’ll want to bind the start and stop goals if you plan on running integration tests. See the pom.xml in the example project for an example of how to do that.

<plugin>
    <groupId>net.kindleit</groupId>
    <artifactId>maven-gae-plugin</artifactId>
    <version>0.8.1</version>
    <configuration>
        <unpackVersion>${gae.version}</unpackVersion>
    </configuration>
    <executions>
        <execution>
            <phase>validate</phase>
            <goals>
                <goal>unpack</goal>
            </goals>
        </execution>
    </executions>
</plugin>

Entity

Next you’ll want to create an entity, which you can do with the commands below.

enum type --class ~.Status
enum constant --name CREATED
enum constant --name DONE

entity --class ~.Todo --testAutomatically
field string --fieldName description
field enum --fieldName status --type ~.Status

In order to leverage Jersey’s JAXB serialization features, you’ll need to annotate your entity with @XmlRootElement. Set a default value for status while you’re here.

import javax.xml.bind.annotation.XmlRootElement;

@RooJavaBean
@RooToString
@RooEntity
@XmlRootElement
public class Todo {

    @Enumerated
    private Status status = Status.CREATED;

...

Resource

Here’s a very simple resource for the entity we created earlier. In addition to the JAX-RS annotations, you also need to annotate the class with @Service, which makes the class eligible for dependency injection and other Spring services. This resource will support both XML and JSON.

package com.example.todo;

import org.springframework.stereotype.Service;

import javax.ws.rs.*;
import java.util.List;

@Service
@Consumes({"application/xml", "application/json"})
@Produces({"application/xml", "application/json"})
@Path("todo")
public class TodoResource {

    @GET
    public List<Todo> list() {
        return Todo.findAllTodoes();
    }

    @GET
    @Path("{id}")
    public Todo show(@PathParam("id") Long id) {
        return Todo.findTodo(id);
    }

    @POST
    public Todo create(Todo todo) {
        todo.persist();
        return todo;
    }

    @PUT
    public Todo update(Todo todo) {
        return todo.merge();
    }

    @DELETE
    @Path("{id}")
    public void delete(@PathParam("id") Long id) {
        Todo.findTodo(id).remove();
    }

}

Final Configuration

At a minumum, you’ll need to have Spring’s OpenSessionInView and Jersey’s SpringServlet filters set up in your web.xml. As with the spring-web module dependency, you will have to create a web.xml in src/main/webapp/WEB-INF if you don’t already have one.

<web-app>

    <!-- Creates the Spring Container shared by all Servlets and Filters -->
    <listener>
        <listener-class>org.springframework.web.context.ContextLoaderListener</listener-class>
    </listener>

    <context-param>
        <param-name>contextConfigLocation</param-name>
        <param-value>classpath*:META-INF/spring/applicationContext*.xml</param-value>
    </context-param>

    <!-- Ensure a Hibernate Session is available to avoid lazy init issues -->
    <filter>
        <filter-name>Spring OpenEntityManagerInViewFilter</filter-name>
        <filter-class>org.springframework.orm.jpa.support.OpenEntityManagerInViewFilter</filter-class>
    </filter>

    <filter-mapping>
        <filter-name>Spring OpenEntityManagerInViewFilter</filter-name>
        <url-pattern>/*</url-pattern>
    </filter-mapping>

    <!-- Handles Jersey requests -->
    <servlet>
        <servlet-name>Jersey Spring Web Application</servlet-name>
        <servlet-class>com.sun.jersey.spi.spring.container.servlet.SpringServlet</servlet-class>
    </servlet>

    <servlet-mapping>
        <servlet-name>Jersey Spring Web Application</servlet-name>
        <url-pattern>/*</url-pattern>
    </servlet-mapping>

</web-app>

You may also need to change the project’s packaging type to war.

<groupId>com.example.todo</groupId>
<artifactId>todo</artifactId>
<packaging>war</packaging>
<version>0.1.0.BUILD-SNAPSHOT</version>

Testing

You can now compile and run the application locally with mvn clean gae:run.

> mvn clean gae:run
...
INFO: The server is running at http://localhost:8080/

The following curl commands can be used to interact with the running application.

# list
curl -i -HAccept:application/json http://localhost:8080/todo
# show
curl -i -HAccept:application/json http://localhost:8080/todo/1
# create
curl -i -HAccept:application/json -HContent-Type:application/json \
  http://localhost:8080/todo -d '{"description":"walk the dog"}'
# update
curl -i -HAccept:application/json -HContent-Type:application/json \
  http://localhost:8080/todo \
  -d '{"description":"walk the dog","id":"1","status":"DONE","version":"1"}' \
  -X PUT
# delete
curl -i http://localhost:8080/todo/1 -X DELETE

Once you’re happy with your application, you can upload it to App Engine. If you download the example project I created, you can build locally with mvn clean install -Dtodo-appid=<your-appid>. The local App Engine server will be used to run some basic integration tests during the build. After the app is built, you can deploy it with mvn gae:deploy. You will be prompted for your login information if you have not set up your your credentials in your settings.xml. Once deployed, you can run the included integration test against the live server with mvn failsafe:integration-test -Dgae.host=<your-appid>.appspot.com -Dgae.port=80. There is also a simple client you can use to write your own tests or experiment with.

Having some level of integration tests for any GAE apps you write is very important, as there are things that do not work consistently between the local development server and the real App Engine servers. Be aware that you can access the local development server console at http://localhost:8080/_ah/admin, which will let you browse the datastore amongst a few other things. Once deployed to the real App Engine, you’re best source of information is the application log. Be sure you’re looking at the correct version; there’s a drop-down menu in the upper left area of the screen that will let you choose the version of the logs you want to examine.

]]>
<![CDATA[Beware the Empty String]]> http://marcschwieterman.com/blog/beware-the-empty-string Marc Schwieterman 2011-02-03T06:30:14+00:00 2011-02-03T06:30:14+00:00 Regardless of how you feel about empty strings, you should be aware of the implications of allowing them on objects that will be persisted. While it seems reasonable to expect a database to store the exact value that you give it, that is unfortunately not always the case. If you’re going to allow empty strings on persistent objects, you should take the time to determine the behavior of the database management system you’re using. You should also assess how likely it is that you are going to either have to support multiple databases, or that you will switch to another database management system in the future.

Different database management systems handle empty strings inconsistently. Some of them will persist and later return an empty string. Others convert the empty string to a null, and some will even turn it into a single space. If you’re not aware of this behavior, you may be in for some fun debugging if the object containing the empty string is used in a set or as a map key. Values that should be unique may appear to be duplicates or just disappear. Be particularly cautious of fields used to determine object equality. Below is a table of a few database management systems and the values that they will persist when presented with an empty string.

Database Persisted Value
MySQL 5.0 Empty String
Oracle 11g Null
Sybase 15.5 Single Space

If you must or want to allow empty strings on persisted objects, you need to determine how to handle them. The main decision to make is if you will support both null and empty strings for the same value. Due to the inconsistent handling across different database management systems, you’ll need to map empty strings into a value that can be persisted reliably. If you don’t need to support null, you can use that. Otherwise you’ll need to use some magic string or an extra field. The most important thing is to be aware that this issue exists, so you don’t waste your precious time figuring out why your objects aren’t given back to you the way you left them.

]]>
<![CDATA[Developing Spring Roo Addons]]> http://marcschwieterman.com/blog/developing-spring-roo-addons Marc Schwieterman 2010-12-29T06:42:31+00:00 2010-12-29T06:42:31+00:00 As of Roo 1.1.0, addons are created with the addon command. This is slightly different than previous versions, where addons were created with a template argument to the project command. If you find documentation referencing this old style, it’s probably out of date.

The first thing you need to do, is checkout the Roo source code. The Git repository is located at git://git.springsource.org/roo/roo.git. There are very good instructions explaining how to build Roo in the readme.txt file at the root of the source tree. Once Roo is built, you’ll need to create a new directory and fire up the Roo shell.

mkdir roo-addon-example
cd roo-addon-example
roo-dev
    ____  ____  ____  
   / __ \/ __ \/ __ \ 
  / /_/ / / / / / / / 
 / _, _/ /_/ / /_/ /  
/_/ |_|\____/\____/    1.1.1.RELEASE [rev 3057660]

roo>

With the shell running, you can create either a simple, advanced or i18n addon.

roo> addon create 

addon create advanced    addon create i18n        addon create simple
addon create simple --topLevelPackage com.example.roo.addon.example
Created /Users/marc/src/roo-addon-example/pom.xml
Created /Users/marc/src/roo-addon-example/readme.txt
Created /Users/marc/src/roo-addon-example/legal
Created /Users/marc/src/roo-addon-example/legal/LICENSE.TXT
Created SRC_MAIN_JAVA
Created SRC_MAIN_RESOURCES
Created SRC_TEST_JAVA
Created SRC_TEST_RESOURCES
Created SRC_MAIN_WEBAPP
Created SRC_MAIN_RESOURCES/META-INF/spring
Created SRC_MAIN_JAVA/com/example/roo/addon/example
Created SRC_MAIN_JAVA/com/example/roo/addon/example/ExampleCommands.java
Created SRC_MAIN_JAVA/com/example/roo/addon/example/ExampleOperations.java
Created SRC_MAIN_JAVA/com/example/roo/addon/example/ExampleOperationsImpl.java
Created SRC_MAIN_JAVA/com/example/roo/addon/example/ExamplePropertyName.java
Created ROOT/src/main/assembly
Created ROOT/src/main/assembly/assembly.xml
Created SRC_MAIN_RESOURCES/com/example/roo/addon/example
Created SRC_MAIN_RESOURCES/com/example/roo/addon/example/info.tagx
Created SRC_MAIN_RESOURCES/com/example/roo/addon/example/show.tagx

After the addon is created, exit the roo shell, then build and install the addon. You can package the addon from within Roo with perform package, but you’ll see why we installed it shortly.

quit
mvn clean install

Having installed the addon, you’re almost ready to use it. There are a few ways to load your addon into the Roo runtime. The one I like the best is to set up your local maven repository as an OSGI Bundle Repository (OBR). The project created with the addon create command is configured to use the Maven Bundle Plugin, which will create a repository.xml file in your local Maven repository. To tell Roo to use your local Maven repository as an OBR, simply add a line to the config.properties file as shown below, where ROO_HOME is the Roo source directory.

// $ROO_HOME/bootstrap/src/main/conf/config.properties
obr.repository.url=file:/home/whoever/.m2/repository/repository.xml

If you’ve recently built Roo from source, you may want to null out the repository.xml file before building your addon, as it will be full of the core Roo addons. Keep in mind that you can use git stash to clean your working directory if you want to pull down the latest development changes later on. Now that Roo knows where to look for your addon, you can start the shell back up.

roo-dev

If you set everything up right, your local Maven repository should now show up as an OBR, and the addon you just installed should be available within it.

roo> osgi obr url list
file:/home/whoever/.m2/repository/repository.xml

roo> osgi obr list
com-example-roo-addon-example [com.example.roo.addon.example] (0.1.0.BUILD-SNAPSHOT)

The main advantage of this approach is that you don’t have to type the path to addons when starting them. Roo will tab-complete the addon bundle name, so you should only have to type enough to make it unique.

roo> osgi obr start --bundleSymbolicName com.example.roo.addon.example
[Thread-2] [com.example.roo.addon.example [73]] BundleEvent INSTALLED
[Thread-2] [com.example.roo.addon.example [73]] BundleEvent RESOLVED
[Thread-2] [com.example.roo.addon.example [73]] BundleEvent STARTED
roo> Target resource(s):
-------------------
   com-example-roo-addon-example (0.1.0.BUILD-SNAPSHOT)

Deploying...done.

[Thread-2] [com.example.roo.addon.example [73]] ServiceEvent REGISTERED

Your addon should now show up in the output of osgi ps.

roo> osgi ps
...
[  75] [Active     ] [    1] com-example-roo-addon-example (0.1.0.BUILD-SNAPSHOT)

roo> say hello --name marc
Welcome marc!
Country of origin: None of your business!
It seems you are a running JDK 1.6.0_22
You can use the default JDK logger anywhere in your add-on to send messages to the Roo shell

You can make changes to your addon and reload it without restarting the Roo shell. To change the command output for the example addon, you can modify the ExampleCommands.java file, change the sayHello method, then reinstall the addon.

mvn clean install
roo> osgi uninstall --bundleSymbolicName com.example.roo.addon.example
[Thread-2] [com.example.roo.addon.example [73]] ServiceEvent UNREGISTERING
[Thread-2] [com.example.roo.addon.example [73]] BundleEvent STOPPED
[Thread-2] [com.example.roo.addon.example [73]] BundleEvent UNRESOLVED
[Thread-2] [com.example.roo.addon.example [73]] BundleEvent UNINSTALLED
[Thread-2] [org.apache.felix.framework [0]] FrameworkEvent PACKAGES REFRESHED

roo> osgi obr start --bundleSymbolicName com.example.roo.addon.example
[Thread-2] [com.example.roo.addon.example [74]] BundleEvent INSTALLED
[Thread-2] [com.example.roo.addon.example [74]] BundleEvent RESOLVED
Target resource(s):
-------------------
   com-example-roo-addon-example (0.1.0.BUILD-SNAPSHOT)

Deploying...done.

[Thread-2] [com.example.roo.addon.example [74]] ServiceEvent REGISTERED
[Thread-2] [com.example.roo.addon.example [74]] BundleEvent STARTED
[Thread-2] [com.example.roo.addon.example [74]] ServiceEvent REGISTERED

roo> say hello --name marc                                            
This is my new message

One downside to the OBR approach, is that you can’t just use the osgi update command to reload your addon. I think this is a bug, as it works fine if you load the addon from an explicit file system path via osgi start --url. Until that gets fixed, you need to uninstall and start the addon to reload it as was shown above.

If you need to debug Roo or your own addon, you can uncomment the DEBUG line towards the end of the roo-dev script. Roo will suspend on startup until you connect to it as a remote application with your IDE of choice.

DEBUG="-Xdebug -Xrunjdwp:transport=dt_socket,address=8000,server=y,suspend=y"

That’s all you need to know to get started. The Spring Roo Forum is a good place to go if you need additional information. This post in particular has some useful direction. You can also build the project documentation locally with mvn site, but be prepared to wait a while. The documentation will be at $ROO_HOME/target/site/reference/html/index.html. It’s still in progress, but the content that’s there is good.

]]>
<![CDATA[Static Content Alongside Jersey Services]]> http://marcschwieterman.com/blog/static-content-alongside-jersey-services Marc Schwieterman 2010-10-28T06:00:00+00:00 2010-10-28T06:00:00+00:00 If you’ve worked with Jersey, you’re likely familiar with the embedded Grizzly server. Though I haven’t seen it mentioned often, Grizzly can indeed serve static content too. The following snippet is all that’s necessary to fire up an embedded web server. These examples were written with Grizzly 1.9.18-m and Jersey 1.4.

GrizzlyWebServer server = new GrizzlyWebServer(8080, "/var/www");

server.start();
...

While I’ve found some evidence that you should be able to just add a Jersey ServletAdapter to the Grizzly server, that doesn’t appear to work with current versions. Fortunately there are still a couple options that do work. If you want to serve both your static pages and Jersey services from the same context path, you can do something like the following. The key differences from a regular Jersey adapter are to specify the location to the static content in the ServletAdapter constructor, and you need to setHandleStaticResources to true.

GrizzlyWebServer server = new GrizzlyWebServer(8080);

ServletAdapter jerseyAdapter = new ServletAdapter("/var/www");
jerseyAdapter.addInitParameter("com.sun.jersey.config.property.packages",
                  "com.yourdomain");
jerseyAdapter.setContextPath("/");
jerseyAdapter.setServletInstance(new ServletContainer());
jerseyAdapter.setHandleStaticResources(true);

server.addGrizzlyAdapter(jerseyAdapter, new String[]{"/"});

server.start();
...

If you want to have different context paths for your static content and services, you can create two adapters like below.

GrizzlyWebServer server = new GrizzlyWebServer(8080);

ServletAdapter staticContentAdapter = new ServletAdapter("/var/www");
staticContentAdapter.setContextPath("/");
staticContentAdapter.setHandleStaticResources(true);

ServletAdapter jerseyAdapter = new ServletAdapter();
jerseyAdapter.addInitParameter("com.sun.jersey.config.property.packages",
                  "com.yourdomain");
jerseyAdapter.setContextPath("/ws");
jerseyAdapter.setServletInstance(new ServletContainer());

server.addGrizzlyAdapter(staticContentAdapter, new String[]{"/"});
server.addGrizzlyAdapter(jerseyAdapter, new String[]{"/ws"});

server.start();
...

One limitation to note is that this approach expects the files to be on the file system, which may not be what you’re looking for if you’re trying to create an executable jar type utility.

]]>
<![CDATA[GData Objective-C Client]]> http://marcschwieterman.com/blog/gdata-objective-c-client Marc Schwieterman 2010-10-21T06:00:00+00:00 2010-10-21T06:00:00+00:00 I’ve recently been working on an iPhone application that integrates with Blogger, and as such I have gotten some experience with the GData Objective-C Client Library. The issues below were all encountered while working with the GDataServiceGoogleBlogger service, but they should apply to the other GData services too.

Authorization Scope

The GData APIs support OAuth for authorization. One of the first things you need to do when initializing a GData service is to decide which authorization scope you’re going to use. The various service implementations have a [Service authorizationScope] method that you can use, but it may not always be the best option.

The default authorization scope for Blogger is https://www.blogger.com/feeds/, but the Blogger API does not consistently return links that use https for the scheme. You have a few options to deal with this issue. The simplest is to just use a scope of http://www.blogger.com/feeds/. Another option is to request an authorization scope for both http and https by specifying them together, separated by a space. The downside of this approach is that Blogger will be listed twice when the user is redirected to Google to authorize your application, which I think looks weird for the user. Finally you can correct the scheme portion of URLs before submitting requests with them, but that won’t work for all API calls, such as for deleting entries.

Also note that some links included in responses may not match the authorization scope at all, for example the http://your-blog.blogspot.com/feeds/posts/default feed URL. The OAuth Playground is an excellent tool for experimenting with the various GData APIs.

Update: The latest version of GDataServiceGoogleBlogger has been updated to make http://www.blogger.com/feeds/ the base service URL until the Blogger https issue is resolved, so things just work now.

Retain Feeds

Something which may not be immediately obvious is that you must retain a feed if you’re going to retain any of its entries. Failing to do so can result in EXC_BAC_ACCESS errors with a stack trace similar to the following.

#0	0x002c646c in xmlStrdup
#1	0x0027580f in xmlCopyPropList
#2	0x00089ec5 in -[GDataXMLNode XMLNodeCopy] at GDataXMLNode.m:879
#3	0x00089c0c in -[GDataXMLNode copyWithZone:] at GDataXMLNode.m:843
...

The issue here is that a feed’s entries refer back to the feed, but they do not retain it. This can be particularly frustrating to debug, as none of the usual NSZombie tricks work, presumably because the failure is occurring down in libxml2 code.

GDataHTTPFetcher Logging

The GData APIs have a very nice logging feature that you can enable with the following code. You can include it pretty much anywhere in your project.

[GDataHTTPFetcher setIsLoggingEnabled:YES]

There is currently a linker bug that requires you to add -ObjC and either the -all_load or -force_load options to the Other Linker Flags section of your build target. Once you’ve done that, you can find the logs deep within your home directory. Mine showed up in ~/Library/Application Support/iPhone Simulator/4.1/Applications/<some UUID>/GDataHTTPDebugLogs.

]]>
<![CDATA[Simple Backup]]> http://marcschwieterman.com/blog/simple-backup Marc Schwieterman 2010-10-05T06:00:00+00:00 2010-10-05T06:00:00+00:00 I finished putting together my personal website backup script, and it can be found on my Github page.

Simple Backup is a bash script that will backup a single file system directory and a mysql database. It is intended to be used for personal web sites, hosting smaller amounts of data. You can run the script out of cron on the server that hosts your website, and it is recommended that you also run a sync process on your personal computer to ensure you have a copy of your backup files that is not on the server.

The default options will remove backup files after they are 30 days
old. File system backups are done via tar, with a full backup once a
week and incremental backups for all other days. The database backup
dumps all tables the configured account has access to. You should set
up a read only mysql user just for backups.

This script is a result of my personal desire to back up my blog, and
it is based on my post about [backing up your personal website](http://marcschwieterman.com/blog/backing-up-your-personal-website/).
I didn't see much else out there, so hopefully this is useful for others
as well. I'm happy to fix any bugs that may be encountered, but I can't
guarantee any kind of timeline. I accept absolutely no responsibility
for the integrity of backups created with this script, and I highly
recommend doing a test recovery if you choose to use it.

I would be happy to hear feedback from anyone who decides to give it a try.

]]>
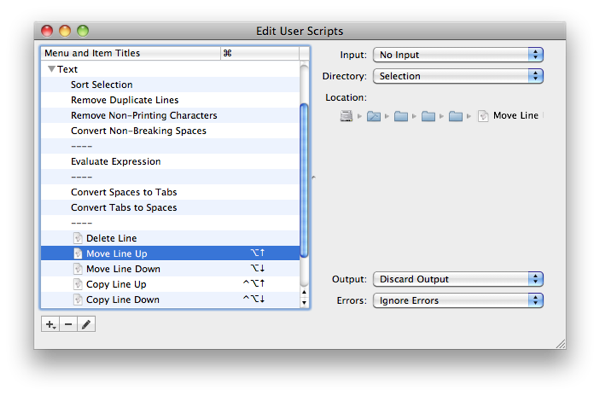
<![CDATA[Moving and Copying Lines in Xcode]]> http://marcschwieterman.com/blog/moving-and-copying-lines-in-xcode Marc Schwieterman 2010-09-20T06:00:00+00:00 2010-09-20T06:00:00+00:00 Being a heavy Eclipse user, I’ve grown accustomed to its keyboard shortcuts for moving and copying lines of text. Xcode doesn’t have a regular editing command for this, but it does offer similar functionality via user scripts. The Move Line Up and Move Line Down scripts are already there, just waiting for you to bind keys to them. Go to the script menu, which is to the left of the Help menu, and select the Edit User Scripts… menu item. Expand the disclosure triangle next to Text, and you can set keyboard shortcuts by double-clicking in the column to the right of the script names. Below is a screenshot of what the dialog will look like if you follow all of the instructions in this post.

edit-user-scripts.png

As you can see, I’ve also added Copy Line Up and Copy Line Down scripts. Xcode doesn’t come with scripts for these commands, but you can pretty easily modify the existing move line scripts to create them. I’ve included the scripts I came up with below. These are just the Apple provided scripts with the delete lines removed and the text selection offsets changed to highlight the copied text.

using terms from application "Xcode"
  tell first text document
    set {startLine, endLine} to selected paragraph range
    if startLine > 1 then
      set theText to (paragraphs startLine through endLine)
      set theText to (theText as string)
      make new paragraph at beginning of paragraph (startLine)
        with data theText
      set selected paragraph range to {startLine, endLine}
    else
      beep 1
    end if
  end tell
end using terms from
using terms from application "Xcode"
  tell first text document
    set {startLine, endLine} to selected paragraph range
    if endLine < (count paragraphs) then
      set theText to (paragraphs startLine through endLine)
      set theText to (theText as string)
      make new paragraph at beginning of paragraph (endLine + 1)
        with data theText
      set theSize to (endLine - startLine)
      set selected paragraph range
        to {endLine + 1, endLine + theSize + 1}
    else
      beep 1
    end if
  end tell
end using terms from

You’ll need to save these scripts somewhere in your home directory. I put them in ~/Library/Application Support/Developer/Shared/Xcode, as that’s were other Xcode customization files go. You can then add the scripts by clicking on the plus in the bottom left corner of the Edit User Scripts window and selecting the Add Script File… menu item. You should also change the four drop down options on the right to be the same as the original move line scripts. Once you’ve added the scripts, you can bind keys to them like any of the other scripts.

If you’re going to make further modifications, you need to be sure you understand the difference between the “shell scripts” and “script files”. Shell scripts will have their contents displayed in the text view on the right side of the Edit User Scripts window. You can safely use the Duplicate Script option on them, because you have your own copy of the content in the XCUserScripts.plist file located in the previously mentioned directory. Script files on the other hand are stored in the main Xcode directory, so you need to manually copy and add them before making any modifications, just like I did for this example.

Finally I’ve noticed that the user scripts don’t block further input while they execute. If you’re trying to move multiple lines of text around, you can actually hit keys faster than the scripts finish executing, which may result in the group of lines being de-selected and getting jumbled up. Because of this, the user scripts are best suited for single lines or short range copies.

]]>
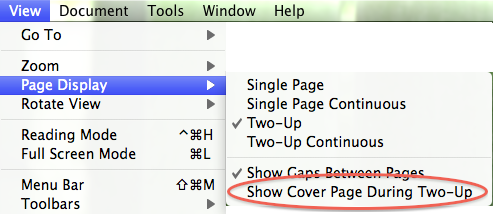
<![CDATA[Reading Two-Up PDFs]]> http://marcschwieterman.com/blog/reading-two-up-pdfs Marc Schwieterman 2010-09-08T06:00:00+00:00 2010-09-08T06:00:00+00:00 Some Two-Up PDFs, such as the new Pragmatic Guide Series, are intended to be read with specific pages on the left or right side of the screen. Unfortunately these types of documents don’t always display the way the author intended in every PDF reader. However most PDF readers do provide features to get the desired presentation.

Preview

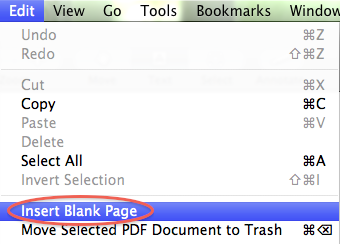
If you have a mac, you’re familiar with the Preview application. I prefer Preview to other options because of the way it maximizes to the full size of the document you’re reading, as opposed to maximizing to take up the whole screen. It doesn’t offer any features that let you directly control the page presentation of two-up PDFs, but you can insert blank pages into the document to force the correct display.

Preview - Insert Blank Page

While this approach seems a bit brute, it does get the job done. It also has the advantage that you only have to do it once for documents that would otherwise require you to toggle a setting on subsequent reads. You can undo (⌘Z) the insert operation if you don’t get the placement right the first time.

Adobe Reader

Everyone who’s used a computer has come across Adobe Reader. Reader offers a_ Show Cover Page During Two-Up_ option that you can toggle on or off to get the desired results. While this saves you from having to modify the document you’re reading, you have to keep toggling the setting if you move back and forth within the document.

Adobe Reader - Show Cover Page During Two-Up

GoodReader

I wrote about GoodReader in my Getting Files onto the iPad post. As further support of GoodReader’s goodness, it dedicates an entire menu to two-up PDF presentation. Simply select the appropriate option from the Pages Layout menu. The menu icon will be the icon for the current presentation mode, so be prepared to look for a different icon if you need to change the setting to something else. Both two-up settings only work in landscape mode.

GoodReader - Pages Layout

]]>
<![CDATA[Backing Up Your Personal Website]]> http://marcschwieterman.com/blog/backing-up-your-personal-website Marc Schwieterman 2010-09-03T07:02:26+00:00 2010-09-03T07:02:26+00:00 Most website hosting companies do their own backups, but they often make no guarantees about actually recovering your data. If you put any amount of effort into a website, you really owe it to yourself to have a decent backup and recovery strategy. You don’t have to do anything too fancy or complicated, but at a minimum you should backup your home directory with tar and any databases that your website uses.

Recoverability

The first thing you need to do is decide what kind of recoverability you need. In enterprise environments, you’ll often hear terms like Recovery Point Objective and Recovery Time Objective. All that really means is how much data you’re willing to lose and how fast you need it to be recovered if something goes wrong. For a personal website, the volume of data is likely to be small enough that recovery time is a non-issue. I think the more relevant consideration is whether you want to be able to do point in time recovery. The main questions to ask yourself are listed below.

  • How often are you going to backup your data?
  • Where are you going to run backups?
  • How long are you going to keep backup files?
  • How are you going to know that your backups are working?

Do Nothing

While not much of a strategy, this is your default option. If you do nothing, you’ll have whatever level of recoverability your hosting service provides. The pro of this strategy is that it’s easy. You don’t have to do anything. The con is that you will most likely lose some amount of your work if there is ever a failure.

Manual Backups

My web host provides cPanel. While I think it’s an impressive piece of software, the backup features leave something to be desired. There are a few options for specifying what is backed up, after which you receive an email when the backup is completed, and you then have a few days to download the backup file from the server. While better than nothing, I personally don’t have the time or inclination to do a manual backup at some regular interval. The pro of this strategy is that you don’t have to write any scripts. The con is that you have to remember to do it, and it takes up your time.

Automated Server Side Backups

Ideally you want your backups to run automatically on the server. This can be as easy as setting up a cron job to execute a script once a day. One of the challenges when working with a server that you don’t actually own, is that you also have to find a way to get the backup files to your personal computer or some other reliable storage location. Having backups files sitting on the server when its file system gets corrupted isn’t going to do much to help you recover your website. Tools like FTP, SCP and rsync can help you copy backup files to your local system.

Automated Client Side Backups

If you can’t run backups on the server, you can always run them on your computer. One of the downsides with this approach is that your personal computer may not always be on or connected to the internet, making the possibility of a scheduled backup failing more likely. You’ll also probably have to pipe command output back through SSH, which not all people are familiar with. On the plus side, you don’t have to worry about copying files to your computer, as they’ll just be there once your backup completes.

Hybrid Backup Strategy

Another option is to run server side backups and have a local job automatically pull down new backup files. This option offers the reliability of server side backups, with the risk that something could happen to the server between the time that your backup completes and the local process downloads the files.

Notification

Once you’ve figured out how to automate your backup process, you should also make sure that you’re notified if something doesn’t work. This is the part that I think many people get wrong. You’ll often see scripts that attempt to build the notification in as part of the backup process. While that seems like a good idea at first, the problem is that if anything goes wrong with the backup script, the notification may never get sent. Recovery time is not when you want to discover a new bug with your backup code.

My preferred way to handle this is to have scripts do something to indicate success, and then I have a separate process that checks for success notifications and reports if any are missing. In a work environment this could be as simple as a web page with red/green icons for failure or success. The important thing is that you want something you look at regularly, where the lack of a recent success message is going to really stand out to you. On your personal computer, you could use something like growlnotify if you’re on a mac.

Offsite Copy

Depending on how paranoid you are, you may want to keep an offsite copy.  You could burn a CD/DVD once a month and drop it off at a friend’s house, or maybe mail it to a PO box. There are also an ever increasing number of “cloud” solutions that let you store files out on the internet. You could use something like Dropbox, although it’s not a pure backup product. I’m currently trying out Mozy, which lets you encrypt backups with your own key. I haven’t used it enough to recommend it yet, but it does seem to address the confidentiality concern that many people have about backing up their files with somebody else.

Do a Recovery

Last but not least, you should really do a test recovery. The last thing you want is to put all this thought and effort into backing up your files, only to find out after a problem that your backups are useless. Most likely all you need is an Apache server and a MySQL database, both of which are free and extremely easy to find good documentation for.

Conclusion

Backing up your personal website is something you should strongly consider. If you’re familiar with shell scripting and standard UNIX tools, you should be able to put something simple together in a few hours. The basic process is to decide what your recoverability requirements are, choose where to run your backups and create some kind of notification mechanism. I’ve been working on a simple backup script for my own site, and I plan on making it publicly available in the near future.

]]>
<![CDATA[Eclipse Generated Equality]]> http://marcschwieterman.com/blog/eclipse-generated-equality Marc Schwieterman 2010-08-25T06:00:00+00:00 2010-08-25T06:00:00+00:00 Most users of Eclipse are familiar with its code generation features. One of the more common of these is “Generate hashCode() and equals()…” from the right-click -> Source (⌘-Opt-S) menu. It roughly follows the recipe on page 33 of Joshua Bloch’s Effective Java, and it is effective in most situations. One case where it doesn’t work is when the class is proxied. Hibernate is just one example of a framework that generates proxies. If the Person class below were proxied, the default Eclipse implementation of equals() would break. In a Hibernate application, this can lead to anything from unnecessary deletes and inserts to some very frustrating bugs.

public class Person {

  private String name;

  public String getName() {
    return name;
  }
  
}

The first potential problem with the default Eclipse equals() is object type. Proxy classes are generally subclasses, but they will never be the same class as the object they’re proxying. As shown here, the default Eclipse behavior is to check for type compatibility with getClass(). If one of our Person objects were a proxy, its class would not be Person, and this equals() method would return false. Fortunately Eclipse offers the option to use instanceof for the type check, so all you have to do to solve this problem is click the “Use ‘instanceof’ to compare types” checkbox.

@Override
public boolean equals(Object obj) {
  if (this == obj)
    return true;
  if (obj == null)
    return false;
  if (getClass() != obj.getClass())
    return false;
  DefaultPerson other = (DefaultPerson) obj;
  if (name == null) {
    if (other.name != null)
      return false;
  } else if (!name.equals(other.name))
    return false;
  return true;
}

Let’s take a minute to talk about what proxies look like internally. The proxies generated by both cglib and Javassist will contain the same fields as the target class, and an actual instance of the target class will be held internally. Any method calls on the proxy are then delegated to this internal instance. Below is conceptually what a proxy looks like.

public class PersonProxy extends Person {

  private String name; // <-- always null!
  
  // the real Person
  private Person person;
  
  public String getName() {
    // do some magic to get the real Person instance
    return person.getName();
  }
  
}

With this in mind, the next problem is the nullness of proxy fields. As shown above, if a Person proxy were passed into the equals() method below, its name field would be null, and the method would return false. The solution to this problem is to use a getter instead of field access.

@Override
public boolean equals(Object obj) {
  if (this == obj)
    return true;
  if (obj == null)
    return false;
  if (!(obj instanceof Person))
    return false;
  Person other = (Person) obj;
  if (name == null) {
    if (other.name != null)
      return false;
  } else if (!name.equals(other.name))
    //                        ^^^^--- This will always be null!
    return false;
  return true;
}

The best way I’ve found to convert an equals() method to use getters is with the “Encapsulate Field…” refactoring. To do this, click on any of the occurrences of name, then right-click on it (⌘-Opt-T) and select “Encapsulate Field…” from the Refactoring menu. Make sure “use setter and getter” is selected, and then click the “Preview” button. If the class only has one field, you can then select both the hashCode() and equals() methods from the “Refactored Source” pane and copy them to the clipboard. Click the “Cancel” button and paste the refactored versions over those currently in the class. If there are multiple fields, you’ll have to encapsulate them all, then undo all of the changes after copying the final method implementations. This approach is less error prone than using find and replace, and it lets you continue to use field access in methods other than hashCode() and equals().

@Override
public boolean equals(Object obj) {
  if (this == obj)
    return true;
  if (obj == null)
    return false;
  if (!(obj instanceof Person))
    return false;
  Person other = (Person) obj;
  if (getName() == null) {
    if (other.getName() != null)
      return false;
  } else if (!getName().equals(other.getName()))
    return false;
  return true;
}

You should now have an equals() method similar to the one above. Because this version uses getters, the calls will always be delegated to the real Person object, and you shouldn’t get any false equality failures. You can certainly still have other issues with your equals() implementation, but these two steps should address the main problems you encounter when proxies enter the picture.

]]>
<![CDATA[Liquibase and the modifySql Tag]]> http://marcschwieterman.com/blog/liquibase-and-the-modifysql-tag Marc Schwieterman 2010-08-20T06:00:00+00:00 2010-08-20T06:00:00+00:00 Liquibase is a tool that helps you manage database changes. It can can be integrated into your build process to automatically update your database, and it also has a command line interface that operational staff can use to generate SQL scripts for production deployment. One of its nice features is database abstraction. You define your changesets in XML, and Liquibase generates compatible SQL for you. As with any tool that tries to provide this level of abstraction over a large number of vendors, it doesn’t work 100% with all DBMS. Below is a simple changeset.

<?xml version="1.0" encoding="UTF-8" standalone="no"?>
<databaseChangeLog xmlns="http://www.liquibase.org/xml/ns/dbchangelog"
  xmlns:xsi="http://www.w3.org/2001/XMLSchema-instance"
  xsi:schemaLocation="http://www.liquibase.org/xml/ns/dbchangelog
  http://www.liquibase.org/xml/ns/dbchangelog/dbchangelog-2.0.xsd">

  <changeSet author="marc" id="1">
    <createTable tableName="test">
      <column name="id" type="INT" />
    </createTable>
  </changeSet>

  <changeSet author="marc" id="2">
    <createIndex indexName="idx1" tableName="test">
      <column name="id" />
    </createIndex>
  </changeSet>

</databaseChangeLog>

Writing these by hand isn’t that bad, especially if you’re using an XML editor that does autocomplete based on the document’s XSD, such as Eclipse WTP. Some of the database compatibility issues you may run into include things like unsupported constraint options, lack of support for DDL in transactions, metadata issues, statement formatting and identifier delimitation. These are not issues with Liquibase, just things that can be incompatible between different DBMS.

If you find yourself faced with one of these incompatibilities, you have a few options. You can open a bug report and wait until it’s fixed. Better yet, you can fix it yourself and contribute back to the project. But if neither of those options will work for you, the modifySql tag may get the job done. This tag lets you modify the SQL that’s generated, so you can do anything from a simple append or character replacement to regular expressions. The example I’m going to cover is how to do a regular expression replacement. Regular expressions in Java are bad enough, but they can be a little confusing in Liquibase because you have to format them for XML. Below is a Java example of what we’re trying to accomplish.

@Test
public void pattern_replaces_quotes_with_square_brackets() {
  String expression = "\"(\\w+)\"";
  Pattern p = Pattern.compile(expression);
  Matcher m = p.matcher("create index \"idx1\" on \"test\" (\"id\")");
  assertThat(
    m.replaceAll("[$1]"), is("create index [idx1] on [test] ([id])"));
  System.out.println(expression.replaceAll("\"", "&quot;"));
}

This pattern will find all instances of one or more word characters ([a-zA-Z_0-9]) within quotes and replace those quotes with square brackets. The $1 contains whatever the first thing in parentheses matched, \w+ in this case. We can’t just do a simple character replacement of double quotes because we have to account for left and right brackets. Note that if you have dashes (-) in your object names, the \w pattern won’t match them. Check out the Javadoc for Pattern if you need to brush up on your regular expression syntax. The println at the end of the test will print out the expression formatted for inclusion in XML, so you can just copy and paste the output into your changelog file. If you follow these steps, you’ll end up with a modifySql tag like the one below.

<changeSet author="marc" id="2">
  <createIndex indexName="idx1" tableName="test">
    <column name="id" />
  </createIndex>
  <modifySql>
    <regExpReplace replace="&quot;(\w+)&quot;" with="[$1]"/>
  </modifySql>
</changeSet>

I would highly recommend creating a unit test like I did to ensure that you have the correct regular expression. You’ll save yourself a lot of time, as doing your verification through Liquibase would require repeatedly executing the change, checking it, then rolling back if necessary to try again. If you’re not interested in adding more XML to your build process, but you’d like a capable tool to manage your database changes, Liquibase is supposed to support SQL changelogs in its 2.0 release.

]]>
<![CDATA[Getting Started with Xcode]]> http://marcschwieterman.com/blog/getting-started-with-xcode Marc Schwieterman 2010-08-17T06:54:51+00:00 2010-08-17T06:54:51+00:00 I finally spent some quality time with Xcode this past weekend. While I haven’t done any real work with it yet, I think it should be a serviceable IDE. The current version of Xcode at the time of this writing is 3.2.3, and it can be downloaded for free from Apple. You do have to register an account if you don’t have one yet, but you don’t have to pay anything until you want to join the iPhone Developer Program. You can’t actually install anything on a mobile device until you subscribe, which mainly gives you a one year certificate that you use to sign your applications.

Debug Messages

The preferred way to print debug messages is with NSLog. One thing to be aware of is that NSLog messages in Unit tests will not go to the debugger console in Xcode. They will however go to the system console, available via Applications -> Utilities -> Console.app. Personally I find that Unit tests largely obviate the need for debug statements, but they do come in handy sometimes. I also stumbled across a Stackoverflow question that describes what looks like a good technique for using breakpoints to generate debug output. Assuming those breakpoints aren’t in test code. More on that later.

Target Membership

File Listing

{% img left /images/posts/2010-08-17-getting-started-with-xcode/compile-sources.png Compile Sources %}

If you get linker errors complaining that the class you’re trying to test isn’t found, you most likely just need to add that class to your test target. Some of the information you come across may say not to do this, but it’s most likely referring to Application tests and not Logic/Unit tests. The easiest way to see if a given file is part of the current target is to look for a check mark in the far right column of the file listing as shown above. You can also check the “Compile Sources” folder under the build target itself, or you can examine the target memberships of a specific file with Get Info -> Targets -> Target Memberships.

Testing

Xcode comes with the OCUnit testing framework, which has been around for quite a while. It provides all the standard equality assertions and setup/teardown stuff that you would expect from an xUnit testing framework. Here’s a very simple example of testing a property. I don’t see a need to maintain separate header files for Unit tests. The ordering for assertions is actual valueexpected valuedescription, and the description is required.

#import <SenTestingKit/SenTestingKit.h>
#import "Person.h"

@interface PersonTest : SenTestCase {	
}
@end

@implementation PersonTest

- (void) testName {
  Person *person = [[Person alloc] init];
  person.name = @"marc";
  STAssertEqualObjects(person.name, @"marc", @"");
}

@end

Apple’s documentation talks about Logic tests and Application tests. One of the key distinctions is that Logic/Unit tests directly include the code they’re testing, while Application tests are injected into the running application via a special target. Any project you set up is going to have at least four targets and two executables for various testing and debugging use.

Build Results

You can bring up the Build Results window with ⌘ - Shift - B, which will give you something like the screenshot below if you have a failing test. With the results window set to “By Step”, you have to click on the little horizontal lines button to see what tests failed, and even then you have to visually filter though all of the test output. Fortunately there is a better way.

By Step

If you click on “By Issue”, you’re presented with a much nicer view that has a line for each failing test.

By Issue

If you click on the test failure message, it’ll bring up the test file and highlight the failing assertion line as shown below. You can see that I just commented out the property setting line in my test to get it to fail for this example. From what I’ve read, Xcode used to display message bubbles in the main editor, but I haven’t been able to figure out if that behavior is still possible.

Failed Assertion

Uncomment the assignment statement, ⌘ - B, and we’re all green again.

Green Bar

Debugging

Debugging is an area that could use some work. Breakpoints in Unit tests just plain don’t work out of the box. Several kind people have written up guides explaining how to get them to work, and I’ve listed some of the better ones below. The core of the solution is creating a separate debug executable that you set some flags and environment variables on. Unfortunately the settings are different depending on if you’re targeting a Mac or iPhone. The options also sometimes change, rendering some posts you my find invalid. Note that breakpoints in application code do work, it’s just the ones in test code that require manual configuration. I plan to explore this area more in the future, but for now I’m more interested in getting some applications working.

Testing and Debugging Resources

]]>
<![CDATA[Maven Transitive Dependency Filtering]]> http://marcschwieterman.com/blog/gotcha-maven-transitive-dependency-filtering Marc Schwieterman 2010-08-11T06:00:00+00:00 2010-08-11T06:00:00+00:00 The other day I wrote a post about examining dependencies in maven plugins. Today I was working on a similar project, and I discovered some non-intuitive behavior with the Maven ArtifactResolver. Several of the resolveTransitively methods accept an ArtifactFilter, but the filter gets applied in an odd way.

The bulk of the resolution process takes place in the DefaultArtifactCollector and ResolutionNode classes. The collector basically does a breadth first search of the dependency tree, but it filters the entire path from the project to the node, as opposed to just filtering the final results. This means that depending on how your filter is defined, there could be dependencies that meet its criteria, but are not included in the ArtifactResolutionResult. Consider a project with the following dependency tree.

[INFO] [dependency:tree {execution: default-cli}]
[INFO] com.mydomain:module:jar:0.0.1-SNAPSHOT
[INFO] +- com.mydomain:dependency:jar:0.0.1-SNAPSHOT:compile
[INFO] |  \- com.mydomain:transitive-dependency:jar:0.0.1-SNAPSHOT:compile

You can filter on a groupId of “com.mydomain”, and you’ll get all of the artifacts. However if you were to try to filter on an artifactId or a type other than jar, you’d get zero results. I’m sure there’s a good reason for the filtering to work this way, but it can take you a while to figure it out if it’s not what you’re expecting. If what you really want to do is filter the final results of the transitive resolution, you need to do that yourself.

]]>
<![CDATA[Hibernate: Automatic Versioning]]> http://marcschwieterman.com/blog/hibernate-automatic-versioning Marc Schwieterman 2010-08-02T06:00:00+00:00 2010-08-02T06:00:00+00:00 One of the optimistic locking features that Hibernate provides is automatic versioning. Versioned objects need to contain either a version or timestamp property that Hibernate uses to detect concurrent modifications at flush time. Hibernate’s versioning mechanism works by checking the number of rows that were affected by an update statement. Consider an accounts table like the one below.

mysql> describe accounts;
+---------+---------+------+-----+---------+-------+
| Field   | Type    | Null | Key | Default | Extra |
+---------+---------+------+-----+---------+-------+
| id      | int(11) | NO   | PRI | 0       |       |
| balance | int(11) | NO   |     | NULL    |       |
| version | int(11) | NO   |     | NULL    |       |
+---------+---------+------+-----+---------+-------+

For the sake of our example, let’s assume that someone has just opened an account. Their balance is currently $0, so their row in the accounts table would look something like this.

mysql> select * from accounts;
+----+---------+---------+
| id | balance | version |
+----+---------+---------+
|  1 |       0 |       1 |
+----+---------+---------+

If our hypothetical user were to make a deposit of $100, Hibernate would increment the account object’s version property, and eventually execute the following update. Pay close attention to the values used for the version column. We’re setting the new version value to 2, but only if the row’s current value for version is 1.

mysql> update accounts
    -> set balance = 100, version = 2
    -> where id = 1 and version = 1;
Query OK, 1 row affected (0.00 sec)

After executing the update statement, Hibernate will check the number of rows that were affected. If nobody else modified the row, then the version will still be 1, the update will modify exactly 1 row, and the transaction commits. Our account now has a balance of $100 and a version of 2.

mysql> select * from accounts;
+----+---------+---------+
| id | balance | version |
+----+---------+---------+
|  1 |     100 |       2 |
+----+---------+---------+

What would have happened if somebody else had modified the row? Perhaps our bank offers a $5,000 sign up bonus for new accounts, and the bonus just happens to post at the exact same moment that we’re making our initial deposit. If the bonus transaction had committed after we read the account balance, but before we committed the deposit, the table would look like this.

mysql> select * from accounts;
+----+---------+---------+
| id | balance | version |
+----+---------+---------+
|  1 |    5000 |       2 |
+----+---------+---------+

Now when our update statement is executed, the account has a balance of $5,000 and a version of 2. Because we’re updating where the version is 1, the update will “miss”. Zero rows will have been modified, and an exception is thrown.

mysql> update accounts
    -> set balance = 100, version = 2
    -> where id = 1 and version = 1;
Query OK, 0 rows affected (0.00 sec)

This is exactly what we want to happen because if our transaction had succeeded, we would have just lost out on $5,000. At this point, our application will need to load a fresh instance of our account object and apply the deposit again.

mysql> update accounts
    -> set balance = 5100, version = 3
    -> where id = 1 and version = 2;
Query OK, 1 row affected (0.00 sec)

This time our update succeeds, and the account has the correct balance of $5,100, with a version of 3.

mysql> select * from accounts;
+----+---------+---------+
| id | balance | version |
+----+---------+---------+
|  1 |    5100 |       3 |
+----+---------+---------+

While automatic versioning solves the problem of concurrent modifications within the boundaries of a database transaction, if your business transactions span multiple server requests, automatic versioning alone isn’t enough. Hibernate has additional features that help with this situation, which I’ll go into in a future post.

]]>
<![CDATA[Examining Dependencies in Maven Plugins]]> http://marcschwieterman.com/blog/examining-dependencies-in-maven-plugins Marc Schwieterman 2010-07-27T07:00:00+00:00 2010-07-27T07:00:00+00:00 After you’ve worked with Maven for a while, you’ll eventually find a need to extend it. While there are some means of executing arbitrary code as part of your build, the best way to handle such needs is to create a maven plugin. The task may seem a bit daunting at first, but you’ll learn a lot about how maven works by doing it. Listed below are the properties that you need to define to examine the dependencies of a maven project from within a plugin. The following code would be placed inside a Maven Mojo.

/** @parameter default-value="${project}" */
private MavenProject mavenProject;

/** @parameter default-value="${localRepository}" */
private ArtifactRepository localRepository;

/** @component */
private ArtifactFactory artifactFactory;

/** @component */
private ArtifactResolver resolver;

/** @component */
private ArtifactMetadataSource artifactMetadataSource;

The @parameter annotation will bind maven properties to the annotated property. You can refer to many properties on common Maven interfaces. The @component annotation binds Plexus components from maven’s DI framework. Unfortunately I’ve yet to find a single, concise documentation source, but the Codehaus Mojo Cookbook and the Maven API doc will point you in the right direction.

Set<Artifact> artifacts = mavenProject.createArtifacts(
    artifactFactory,
    null,
    new GroupIdFilter("com.mydomain")
);

ArtifactResolutionResult arr = resolver.resolveTransitively(
    artifacts,
    mavenProject.getArtifact(),
    mavenProject.getRemoteArtifactRepositories(),
    localRepository,
    artifactMetadataSource
);

Set<Artifact> completeDependencies = arr.getArtifacts();

for(Artifact art : completeDependencies) {
  // do something interesting
}

Once you have access to all the needed properties, you can use code similar to the above to examine the dependencies of your project. This particular snippet will collect all dependencies and transitive dependencies for artifacts with a group id of “com.mydomain” into the completeDependencies set. GroupIdFilter is a simple implementation of the ArtifactFilter interface. Note that these are the dependencies of the project that the plugin is executing in, not just those of the plugin itself.

JarFile jar = new JarFile(artifact.getFile());

The ability to determine all of the transitive dependencies of your project like this can be very powerful. Once you get ahold of an artifact, you can easily create a JarFile and inspect its manifest, entries or whatever you’re interested in. This allows you to do things like create artifacts that contain code or configuration that feeds into your build process, and automatically discover and take action merely by adding them as a project dependency.

]]>
<![CDATA[Getting Files onto the iPad]]> http://marcschwieterman.com/blog/getting-files-onto-the-ipad Marc Schwieterman 2010-07-19T06:39:28+00:00 2010-07-19T06:39:28+00:00 The lack of a file system on the iPad and other iOS based devices can sometimes be frustrating. While applications like Dropbox make accessing your existing files trivial, getting new files onto your device directly from the web is not as easy. If you come across a PDF or other file that you’d like to open in a local application, you may be out of luck.

The best way I’ve found to get files onto the iPad without the aid of your computer is GoodReader. In addition to being an excellent PDF reader, GoodReader is also a robust file manager. It supports about anything you can think of, including Dropbox, iDisk, USB, FTP and even a web-based interface accessible via WiFi. Most importantly, you can give it a URL, and it will download the specified file into its local storage.

The GoodReader manual includes instructions on how to save a file from Safari into GoodReader. You have to either add a special prefix to the URL, or you can copy and paste it into the application. GoodReader supports this feature by registering a protocol handler for ghttp, grhttp, and a few others. While I think this is a great feature, I don’t particularly like doing things manually, so I created a simple bookmarklet to do this for me.

javascript: location.assign('gr' + location.href);

The bookmarklet uses the Location object to open a new page to the current URL with ‘gr’ prepended to it. This saves you from manually editing or copying the URL of the document you want to download. You can install the bookmarklet with the instructions below.

  1. Bookmark this page
  2. Copy the bookmarlet script above to your clipboard
  3. Edit the bookmark
  4. Set the name to something appropriate. I use ‘goodreadit’.
  5. Paste the code into the address field

The easiest way to copy the bookmarklet script on the iPad is to hold your finger down on it until the copy button pops up. Once the bookmarlet is installed, all you need to do is click on it, and whatever document you have open in Safari will automatically start downloading into GoodReader. According to the GoodReader documentation, the import feature may not always work correctly with SSL, but I’ve yet to have any trouble with it.

]]>
<![CDATA[Simple Stub Creation with Mockito Partial Mocks]]> http://marcschwieterman.com/blog/simple-stub-creation-with-mockito-partial-mocks Marc Schwieterman 2010-07-16T06:50:27+00:00 2010-07-16T06:50:27+00:00 When testing code that interacts with lower layers, I often stub out the lower layer to return objects to the code that I’m actually testing. I mostly use stubs generated by a mocking framework, but I occasionally come across cases where the stub needs to do something other than just return a known object. Take the case of a DAO that assigns a generated identifier to a domain object. Here we see a service that takes a name, creates a User object with it, persists the object and returns the generated id to the caller.

public interface UserService {

  Long create(String name);

}

In this situation, I would want to test that the following are true.

  1. the service calls the persist method on the DAO
  2. the service returns the correct id value

Testing the DAO call is easy enough using a mock.

@Test
public void create_calls_persist() {
  UserDao dao = mock(UserDao.class);
  UserService service = new UserServiceImpl(dao);

  service.create("bob kelso");

  verify(dao).persist(any(User.class));
}

How do we test that the service returns the correct id? The id will be null by default because it’s a Long. At the very least we should make sure it’s a non-null value, and we would prefer to assert that it’s something specific. We can’t stub the domain object because the service creates it. One option is to create a stub implementation of the DAO that simply sets the object’s id to a known value. Assume that our DAO interface looks like the one below.

public interface UserDao {

  void persist(User user);
  void update(User user);
  void delete(User user);
  User load(Long id);
  User findByName(String name);

}

While there aren’t too many methods, we really don’t care about anything but persist, so it’d be nice if we only had to deal with the things we do care about. This is where Mockito comes in. Using the partial mocks feature added in version 1.8.0, we can create an abstract class that only implements the persist method, and let Mockito supply its useful default implementations for the rest of the methods.

public class UserServiceTest {

  public static final Long ONE_OF_TYPE_LONG = 1L;

  public static abstract class UserDaoStub implements UserDao {

    @Override
    public void persist(User user) {
      user.setId(ONE_OF_TYPE_LONG);
    }

  }

}

We now have an abstract stub for our DAO that will set the id of any objects it persists to a 1 of type Long. You can obviously do something more complicated if needed. Next we use Mockito to provide the rest of the implementation.

@Test
public void create_returns_generated_id() {
  UserDao dao = mock(UserDaoStub.class);
  doCallRealMethod().when(dao).persist(any(User.class));
  UserService service = new UserServiceImpl(dao);

  Long id = service.create("bob kelso");

  assertThat(id, is(ONE_OF_TYPE_LONG));
}

The only thing different about creating a partial mock, is that you need to call either thenCallRealMethod() or doCallRealMethod() to indicate which method calls to delegate to the real object. The example above uses doCallRealMethod() because persist has a void return type. I’ve found this technique to be a very effective way to create focused stubs that allow you to specify what you need to, and not worry about the rest.

Update 2012-05-31

Someone pointed out in the now gone comments that this approach does not work if the stub class needs to carry state. If this is the case for you, you may want to consider a fake. This may also be an opportunity to refactor your code to make it easier to test the desired behavior in isolation.

]]>
<![CDATA[MarsEdit: Preview with SyntaxHighlighter]]> http://marcschwieterman.com/blog/marsedit-preview-with-syntaxhighlighter Marc Schwieterman 2010-07-06T21:24:07+00:00 2010-07-06T21:24:07+00:00 I’ve recently been trying out the MarsEdit blog editor. One issue I’ve run into is that SyntaxHighlighter doesn’t work with the preview feature because the page in the preview window only gets loaded once. Fortunately there is a workaround. A typical SyntaxHighlighter configuration will look similar to the code fragment below.

<script type="text/javascript">
  ...

  SyntaxHighlighter.all();

</script>

To get SyntaxHighliter to work in the preview pane, you need to write a javascript function to execute the highlighting code repeatedly at some interval. The following code will highlight the page once, then highlight it again every second. The main difference is that you must call SyntaxHighlighter.highlight(), as SyntaxHighlighter.all() will only highlight your text when the page’s onLoad event is executed.

<script type="text/javascript">
  ...

  function refreshHighlighting() {
    SyntaxHighlighter.highlight();
    setTimeout("refreshHighlighting()", 1000);
  }

  refreshHighlighting();

</script>

That’s all there is to it. The timeout is in milliseconds, and I haven’t noticed any appreciable load at 1 second. You can set the refresh interval to something higher, but be aware that you’ll have to wait that long for your code to be highlighted again in the preview window. Refer to the setTimeout reference if you have more robust refresh timing needs.

]]>